I've been eating gluten-free for about seven years now. For most things, there are reasonable substitutes, even if needing to be made from scratch. You can even get genuine gluten-free Oreos now, and they're good.
The problem has been bread. Most gluten-free breads are either so dense that you can't really make a reasonable sandwich from them, or they're so crumbly or brittle that they fall apart to a sandwich of any substance.
I've tried different recipes over the past seven years. Some work well, but they've always had those same problems. They were passable, but they weren't exciting.
My sister texted me a few weeks ago about the concept of gluten-free sourdough. I'd seen recipes in several different cookbooks, but it always seemed like too much work. This was different in that it really wasn't that different from regular sourdough. Grow starter for several days, and finally you get some decent bread. There's a ton of discard to deal with, and you have to get creative with how the discard is used.
I'll post the starter and, as I track what I do with excess discard, I'll post some of those as well. This post, however, is about the bread itself.
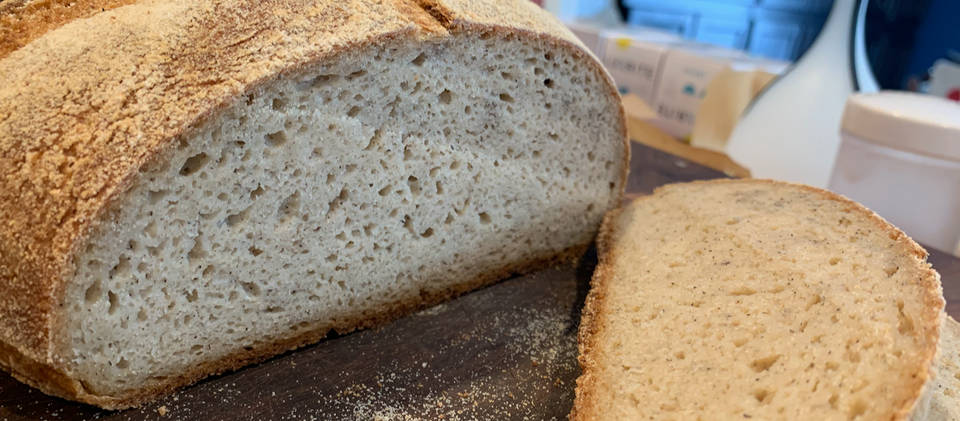
This is the mixture I've settled on for making gluten free sourdough bread and buns. If you're looking for stretchy, gluten-y bread, you're not going to find it. What you may find is a bread that is exciting in flavor, texture, and nutritional value. You might have to reimagine your concept of bread a little, but it serves the main purpose that bread is supposed to serve: it's a vessel. You can make a sandwich that has good texture. You can have a burger that doesn't fall apart. You can have garlic bread that has a wonderfully chewy texture. You can have amazing croutons that hold some crunch when put into soups or onto salads.
You can have bread again.
And lots of it...
Ingredients
Preferment (prepare at night and proof until morning)
- 150g sourdough starter (125% hydration - sorghum, quinoa, white rice flours)
- 100g water
- 80g sorghum flour
- (plus add 20g olive oil when mixing in liquids and yeast) [Optional, but highly recommended to soften the crust]
Liquids
- 20g psyllium husk (whole, not powder)
- 15g maple syrup or honey
- 250g water
Yeast
- 10g maple syrup or honey
- 50g water (120º F)
- 10g instant/quick rise yeast
Dry
- 80g tapioca starch/flour (not cassava flour)
- 90g potato starch (not potato flour)
- 35g sorghum flour
- 35g millet flour
- 40g teff flour
- 40g almond flour
- 12g fine sea salt
Allergens
- This is/can be rice-free (the current starter has a little bit of rice in it, but that's easy enough to remove)
- Contains almonds
- Contains grains/pseudo-grains (sorghum, millet, teff)
- Contains sweeteners (maple syrup or honey)
- Contains yeast
Substitutions
You can probably substitute most flours or starches for the ones listed. I haven't experimented enough with variations yet to say too much what will and won't work. That said, the one flour I think is probably the deal breaker is teff. It adds a bit of stretch and softness to the bread that I wasn't getting with other variations I tried.
I think the starch to flour ratio is probably important. I intend to try different combinations to see how much of a difference this makes. As indicated, don't use potato flour in place of potato starch. I have not tried substituting potato flour for any of the other flour yet.
I was recently off nuts, so I have not experimented with almond, cashew, hazelnut, etc. flours. I'd imagine a little bit of substitution would work fine, but it's on my list to test this.
I would not substitute coconut flour for anything listed, at least straight up. I think that it would result in a bread with a weird texture.
Directions
- In the evening, I mix together the preferment in a glass bowl and a feed my starter. The preferment sits at room temperature, covered with a towel, until morning.
- In the morning, I first mix the yeast, water, and maple syrup in a small glass bowl to activate the yeast.
- While the yeast is activating, I mix together the liquids in a glass bowl and then whisk the dry ingredients together in the bowl of a stand mixer.
- Mix yeast and liquids into preferment with olive oil and whisk until incorporated
- With a spatula or wooden spoon stir the wet ingredients into dry until all of the dry ingredients are incorporated into the dough ball.
- Use the dough hook of the stand mixer and mix on low for about five minutes, stopping a couple times to make sure all the dry is mixed in.
- The next step depends on what you're making:
– When making a boule, transfer dough to a floured (I use white rice flour) 8 inch banneton.
– When making a sandwich loaf, transfer dough to a floured (I use white rice flour) bread pan with collar. Make sure the loaf is pushed down into the corners and roughly flat. Brush the loaf liberally with water.
– When making hamburger buns, divide the dough into 8 equal portions (they should be about 120-125g each), and with liberally oiled hands, roll the dough portions into balls. Place the dough balls into a lightly floured (I use white rice flour) well of a hamburger bun mold sitting on a jelly roll pan or baking sheet, and lightly flatten. Brush liberally with water. - Regardless of what you're making, cover the dough with a light towel, and let rest all day at room temperature (8-10 hours should be fine).
- When ready to bake the bread, preheat the oven to 425º F. I use the convection fan in my oven.
– If baking a boule in a dutch oven, place dutch oven in oven while preheating. - Bake the bread, depending on what you're making:
– For boules, make a parchment sling, and carefully transfer the loaf to the parchment. Score the loaf as desired with a sharp paring knife or bread lame. Remove the dutch oven from the oven and remove the lid. Carefully move the loaf to the dutch oven using the parchment sling. Cover the dutch oven and place back in oven. Bake for 45 minutes covered, then remove the lid, and bake for another 15 minutes.
– For sandwich bread, again brush the loaf with water, and cover the loaf pan and collar with aluminum foil. Carefully put pan in oven, and bake for 40 minutes. Remove the foil and bake for another 10 minutes.
– For hamburger buns, again brush the rolls with water, and carefully and loosely cover the pan with foil. I use ring molds to space the foil above the rolls. Bake for 25 minutes, then remove foil and bake for another 10 minutes. - Remove bread from oven and carefully transfer to a cooling rack.
– When making sandwich bread, I let the loaf cool upside down on a cooling rack before removing the collar. - Let rest until completely cool.
Notes
I usually finish preparation and cover around 7am, preheat oven at 4:45pm, and then begin baking at 5:30ish, depending on when I get home from work. I let the bread rest until morning before cutting into to eat.
Storage
I often slice sandwich loaves and boules and freeze. Hamburger buns get individually wrapped in plastic wrap and then stored in the freezer until ready to use.
Consumption
This bread is great on its own, toasted with almond butter and fruit preserves, or griddled with olive oil, garlic, and salt. It makes great bread pudding and french toast. It's dense compared to gluten-y white bread, but it's on par (I think) to a very hearty Ezekiel bread sort of loaf. The buns hold up to loaded hamburgers and serve well in sausage and egg breakfast sandwiches.
Overall, this is one of the best gluten free breads I've tried!
Sources
These are the sources I'm currently using for ingredients. I tend to buy in bulk, as there is often a significant discount in doing so.
- White Rice Flour: Nuts.com
- Brown Rice Flour: Nuts.com
- Sorghum Flour: Nuts.com
- Teff Flour: Nuts.com
- Millet Flour: Nuts.com
- Oat Flour: Anthony's
- Almond Flour: Nuts.com
- Tapioca Starch: Anthony's
- Potato Starch: Anthony's
- Psyllium Husk: Anthony's
- Maple Syrup: Tapped
- Fine Sea Salt: Redmond Real Salt
- Instant Yeast: SAF
References
The following were inspiration and motivation for this bread:
- My wife, who doesn't need to be gluten-free but suffers along with me
- My sister
- My mom
- Bakerita
- George Eats
- Countless Cookbooks and blogs
A Word on Links
I do not receive sponsorships for any of the links listed here. I'm linking to the resources that I do as a matter of transparency and because those are the products that I use or used. Sometimes the specific product can make a difference in the end result of a recipe, sometimes it doesn't.

